Showing posts with label Xcode. Show all posts

Saturday, 15 February 2014

How to change the background color of UIView with delay/animation: Xcode/cocos2d

We can change the background color of an UIView with delay as follows. This can be also used for many other UIElement animations such as changing the properties of an UIButton (such as textColor) with delay/animation.


 [UIView animateWithDuration:2.0 animations:^{
    [myView setBackgroundColor:[UIColor grayColor]];
 }
    

How to set UIImageView image with delay/animation: Xcode/Cocos2d

We can set the image of an UIImageView with delay/animation as follows:


[UIView transitionWithView:myImageView
                      duration:1.0
                       options:UIViewAnimationOptionTransitionCrossDissolve
                    animations:^{
                        myImageView.image = [UIImage imageNamed:@"newImage.png"];
                    } completion:nil];


Thursday, 9 January 2014

How to focus on last cell in a UITableview in Xcode


//Create a method to find out the last index of your table view and will focus to that cell with an animation:

-(void)autoFocusTableCell{
    NSIndexPath *lastIndexPath = [self lastIndexPath];
    [myTableView scrollToRowAtIndexPath:lastIndexPath
                       atScrollPosition:UITableViewScrollPositionBottom animated:YES];
}


//Code to find the last index of your tableview.
-(NSIndexPath *)lastIndexPath{
    NSInteger lastSectionIndex = MAX(0, [myTableView numberOfSections] - 1);
    NSInteger lastRowIndex = MAX(0, [myTableView numberOfRowsInSection:lastSectionIndex] - 1);
    return [NSIndexPath indexPathForRow:lastRowIndex inSection:lastSectionIndex];
}

//Then call the method
    [self autoFocusTableCell];
    

Tuesday, 24 December 2013

How to sort an array with respect to another

You can sort an array with respect to another easily by adding them to an NSDictionary and do as follows:
            
    // Put the two arrays into a dictionary as keys and values
    NSDictionary *dictionary = [NSDictionary 
                               dictionaryWithObjects:secondArray forKeys:firstArray];
    // Sort the first array
    NSArray *sortedFirstArray = [[dictionary allKeys]  
                               sortedArrayUsingSelector:@selector(compare:)];
    // Sort the second array based on the sorted first array

    NSArray *sortedSecondArray = [dictionary objectsForKeys:sortedFirstArray 
                                             notFoundMarker:[NSNull null]];

How to set an image at the left corner of an UIButton

Let button Frame is:

  myButton.frame = CGRectMake(0, 0, 80, 30);

            
To set an image at the left corner of an UIButton, do as follows:

  [myButton setImageEdgeInsets:UIEdgeInsetsMake(0, 30, 0, 80)];

Sunday, 24 November 2013

How to shuffle an NSMutableArray in an easy way

There are several methods to sort an NSMutableArray. Here we will give you a very simple method to shuffle your NSMutableArray. This method uses the default exchangeObjectAtIndex method to shuffle the array.

Lets initialise a mutable array and add some elements to it as below:

 // Initialising the NSMutableArray
   NSMutableArray *myArray = [[NSMutableArray alloc]init];

 // Add some objects to it (say 15, here) 
   for (int i=1; i<=15; i++) {
     [myArray addObject:[NSString stringWithFormat:@"%d",i]];
   }

Now you have an array with 15 objects/elements in it. Now for sorting the above array, you just need to use the following code:

 // Code for shuffling
  for (int i = 0; i < [myArray count]; ++i) {
    [myArray exchangeObjectAtIndex:i withObjectAtIndex:((random() % ([myArray count]-i)) + i)];
  }


Tuesday, 5 November 2013

How to Install cocos2d in Xcode

Cocos2d is a powerful game engine, that can be added inside Xcode. It's installation steps are as simple as below:


  • Keep the downloaded file in your desktop.
  • Open terminal and type cd
  • Drag your latest version of cocos2d package into the terminal window.
  • Type sudo and open the cocos2d package, and drag the 'install-templates.sh' file into your terminal window. Then press 'Enter'.
  • Put your administrator password to install templates.
Now open your Xcode and see that the cocos2d has been successfully integrated. That's all...


How to hide status bar in iOS7

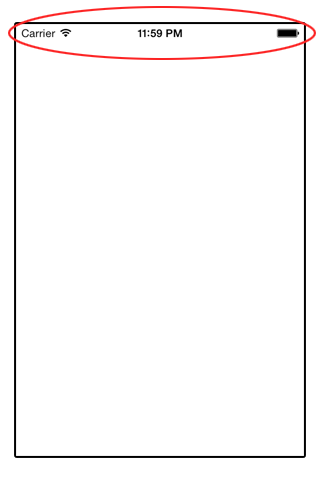
This post is about the UIStatusBar issue with the iOS 7, Xcode based applications. In your latest application, you can hide the UIStatusBar on application launch by selecting the Hide during application launch property as below:


But this isn't enough for hiding the ststusbar inside the app. That is, inside your iOS 7 app, you may see the status bar as it is:


For solving this, just do the following:
  • Open your info.plist
  • Add a row and name it as : View controller-based status bar appearance and set it to NO


That is: 

<key>UIStatusBarHidden</key>
<true/>
<key>UIViewControllerBasedStatusBarAppearance</key>
<false/>

We also attaching sample screenshot for your information:


Wednesday, 26 June 2013

How to create SegmentedControlButton to change color of textfield-text in Xcode

 Here, we will teach you how to make a segmented control button with 3 segments, and how it can be used for changing color of text in an UITextfield.


in .h:

        @interface ViewController : UIViewController{
            IBOutlet UISegmentedControl *colorChooser;
            IBOutlet UITextView *sampleText;
        }
        @property(nonatomic, retain) UISegmentedControl *colorChooser;
        @property(nonatomic, retain) UITextView *sampleText;

        -(IBAction)colorChanged;
        @end

in .m:

        @implementation ViewController

        @synthesize colorChooser,sampleText;

        -(IBAction)colorChanged{
            if (colorChooser.selectedSegmentIndex==0)sampleText.textColor= [UIColor blackColor];
            if (colorChooser.selectedSegmentIndex==1)sampleText.textColor= [UIColor blueColor];
            if (colorChooser.selectedSegmentIndex==2)sampleText.textColor= [UIColor redColor];
   
        }
in xib:
 
  • Drag and drop a segmented control view, and make it a 3 segmented one.
  • Drag and drop a text view
  • From "Connections inspector-window", connect:
                          Segmented Control : Value Changed            ---->colorChanged
                          Segmented Control : New referencing outlet ---->colorChooser
                          TextView          : New referencing outlet       ---->sampleText 


Now Build and Run the application. You can see the text field and 3 segmented button. Click on each segment and see the change in color of the textfield text.


Friday, 7 June 2013

How to check leap year: Objective C

            If you are an Objective C developer, who is going to make a calender type or something similar applications, then sometimes you may need to find out whether a year is leap year or not. You can use the following function to check whether a year is leap year or not.

Just pass the year to be checked (yearPassed) as an integer value to the following function. Then the function will check for leap year and it will return either 0 or 1 according to the conditions. If it returns 0, then the year is not a leap year. If it returns 1, then the year you passed to the function is a leap year.

Function syntax:

        -(int)leapYearCheck:(int )yearPassed{
               int isLeapYear = 0;
               int yearTocheck = yearPassed;
   
               if (yearTocheck%400 ==0) {
                          isLeapYear = 1;
               }else if (yearTocheck%100 ==0){
                         isLeapYear = 0;
               }else if (yearTocheck%4 ==0){
                         isLeapYear = 1;
               }else if(yearTocheck%4 != 0){
                        isLeapYear = 0;
               }
               return isLeapYear;
         }

Wednesday, 5 June 2013

How to change the image inside UIImageView programmatically: Xcode


In this tutorial, you are going to study how to change the images inside an UIImageView in button click.


 For that, first drag & drop 2 images(say Image1.png & Image2.png)to the project

in.h:

    @interface ViewController : UIViewController
    {
        IBOutlet UIImageView *imageView_;
    }
    -(IBAction)changeToimg1;
    -(IBAction)changeToimg2;
    @end

   
in.m:

    @implementation ViewController

    -(IBAction)changeToimg1
    {
        // This will set Image1.png as the UIImageView image
        UIImage *img1 = [UIImage imageNamed:@"Image1.png"];
        [imageView_ setImage:img1];
    }

    -(IBAction)changeToimg2
    {
        // This will set Image2.png as the UIImageView image
        UIImage *img2 = [UIImage imageNamed:@"Image2.png"];
        [imageView_ setImage:img2];
    }

   
in.xib:
  • Drag and drop UIImageView to the main window
  • Place 2 UIButtons on the screen, name the button labels as Image1 and Image2 respectively for your conveniance
  • Click on the imageView and co
               New Referencing Outlet   --->    imageView_
  • Click on Button1 and connect
               Touch Up Inside             ---->    changeToimg1
  •  Click on Button2 and connect   
               Touch Up Inside          ---->   changeToimg2


Now save and Run the program. Click on the buttons, and you can see the images changing.

Tuesday, 4 June 2013

How to call a function using NSTimer: Xcode

NSTimer can be used to call functions with a scheduled delay. You can control the interval and repeat mode (whether the function need to be called per every delay intervals or not) also. The syntax is very simple, and is given below:

Syntax:

         [NSTimer scheduledTimerWithTimeInterval:0.60
                                                                   target:self
                                                                   selector:@selector(myFunction)
                                                                   userInfo:nil
                                                                   repeats:NO];

How to create an UITableView: Xcode

Overview: 
     An instance of UITableView (or simply, a table view) is a means for displaying and editing hierarchical lists of information.


xib:

 Drag and drop tableView.
 Connect  tableView : dataSource   ---->     viewController/File's owner
                                  deligate         ---->     viewController/File's owner

in .h:

@interface ViewController : UIViewController <UITableViewDataSource,UITableViewDelegate>
{
     NSArray *exercises;
    UITableViewCell *cell;
}
@end

in .m:

@implementation ViewController
     
- (void)viewDidLoad
{
  //-----------create table list array-----------//
     exercises = [[NSArray alloc]initWithObjects:@"Name 1",@"Name 2",@"Name 3",@"Name 4",
                             @"Name 5",@"Name 6",@"Name 7",@"Name 8",@"Name 9",@"Name 10",nil];
   
     [super viewDidLoad];
}

 //Add table view delegates //

//------------delegate that decides the number of rows in table view--------------//        
- (NSInteger)tableView:(UITableView *)tableView numberOfRowsInSection:(NSInteger)section{
      return exercises.count;
}

//------------delegate decides the content of each table cell--------------//
- (UITableViewCell *)tableView:(UITableView *)tableView cellForRowAtIndexPath:(NSIndexPath *)indexPath{
      //-----------create a cell-----------//
        cell = [[UITableViewCell alloc]initWithStyle:UITableViewCellStyleDefault reuseIdentifier:@"cell"];
   
     //-----------fill it with contents-----------//
        cell.textLabel.text = [exercises objectAtIndex:indexPath.row];
           
     //-----------return it-----------//
        return cell;
}

//------------To get the touched cell val/name --------------//
 - (void)tableView:(UITableView *)tableView didSelectRowAtIndexPath:(NSIndexPath *)indexPath
{
        NSLog(@"Selected Row    %@",[exercises objectAtIndex:indexPath.row]);
}

//------------Table view swipe delete deligate(optional)------------//

                            For using this method, you have to add and connect IBOutlet to your table view (say myEditableTable), and load your table from an NSMutableArray (say exercises_Mutable). Then use the following method:


- (void)tableView:(UITableView *)tableView commitEditingStyle:(UITableViewCellEditingStyle)editingStyle forRowAtIndexPath:(NSIndexPath *)indexPath {
   
    if (editingStyle == UITableViewCellEditingStyleDelete) {
        // Repsond to delete
NSLog(@”Delete-à %@”, [exercises_Mutable objectAtIndex:indexPath.row]);
[exercises_Mutable removeObjectAtIndex: indexPath.row] ;
[myEditableTable reloadData];

    }    
}

Here, the ‘[exercises_Mutable removeObjectAtIndex: indexPath.row]’ will remove the clicked indexed element from your Mutable array, and ‘[myEditableTable reloadData]’ will reload the table with the changed array.

Optional : And if you want to change the text of the Delete button you can use the following syntax*/
                  tableView:titleForDeleteConfirmationButtonForRowAtIndexPath:


//------------To add an image to UITableViewCell(optional)------------//
-(void)tableView:(UITableView *)tableView willDisplayCell:(UITableViewCell *)cell forRowAtIndexPath:(NSIndexPath *)indexPath{
        cell.backgroundColor = [UIColor colorWithPatternImage:[UIImage imageNamed:@"myImage.png"]];
  }


//------------To change UITable view separator color and style(optional)------------//
 Separator is the straight line that separates each cell in a tableView. You have control over it's style and color. You can change those properties as follows:

        myTableView.separatorStyle=UITableViewCellSeparatorStyleSingleLine;
        myTableView.separatorColor = [UIColor brownColor];

How to check whether there is internet connection with the device: cocos2d/Xcode

You can check whether there is internet connection with the device/not with the help of following code:

     // in .h File //

        Import Reachability class.


    // in .m File //

        if([self connected] )
        {
            NSLog(@"Internet connected\n");
        }
       
        - (BOOL)connected
        {
            Reachability *reachability = [Reachability reachabilityForInternetConnection];
            NetworkStatus networkStatus = [reachability currentReachabilityStatus];
            return !(networkStatus == NotReachable);
        }

How to create iOS application badge: cocos2d/Xcode

In many iOS apps, you may have noticed the number indicator inside a red circle above the application icon. It is called icon badge or simply badge.


The badge is used mainly for indicating local or push notification messages. You can create the icon badge with desired number inside with a very easy, single line code as below:

Syntax:

        [UIApplication sharedApplication].applicationIconBadgeNumber = 23;

How to convert the normal textfield keyboard to e-mail keyboard:cocos2d/Xcode

 Mail keyboard or changing keyboardtype:

    mailField.keyboardType = UIKeyboardTypeEmailAddress; // where mailField is the text field

Monday, 3 June 2013

Get current date, month and year: cocos2d/Xcode

To get current date, month and year, you can use the following code:

    NSDate *now = [NSDate date];

    NSLog(@"now: %@", now); // now: 2011-02-28 09:57:49 +0000

    NSString *strDate = [[NSString alloc] initWithFormat:@"%@",now];
    NSArray *arr = [strDate componentsSeparatedByString:@" "];
    NSString *str;
    str = [arr objectAtIndex:0];
    NSLog(@"strdate: %@",str); // strdate: 2011-02-28

    NSArray *arr_my = [str componentsSeparatedByString:@"-"];

    NSInteger date = [[arr_my objectAtIndex:2] intValue];
    NSInteger month = [[arr_my objectAtIndex:1] intValue];
    NSInteger year = [[arr_my objectAtIndex:0] intValue];

    NSLog(@"year = %d", year); // year = 2011
    NSLog(@"month = %d", month); // month = 2
    NSLog(@"date = %d", date); // date = 2

Sunday, 2 June 2013

How to read an image from file and display it in an UIImageView programmatically: cocos2d/Xcode

Reading an image from  file and displaying it on an ImageView is very siple as follows:

    -(void)CreateView{

        // Fetch saved image //

            NSArray *paths = NSSearchPathForDirectoriesInDomains(NSDocumentDirectory, NSUserDomainMask, YES);
            NSString *documentsDirectory = [paths objectAtIndex:0];
            NSString *imgPath = [documentsDirectory stringByAppendingPathComponent:[NSString stringWithFormat:@"Img_%d.png",currentProfileIndex]];
            UIImage *img_1 = [UIImage imageWithContentsOfFile:imgPath];

      
        // Create an UIView //
       
            UIView *bgView = [[UIView alloc] init];
            bgView.frame = CGRectMake(240, 160, 10, 10);
            bgView.backgroundColor = [UIColor clearColor];
            [[[CCDirector sharedDirector]openGLView] addSubview:bgView];   


       // Create an UIImageView and display to display the image //

            UIImageView *bgImg = [[UIImageView alloc] initWithFrame:CGRectMake(240, 160, 50, 50)];
            bgImg.image = img_1;                    // Set the saved image to the UIImageView
            bgImg.center = CGPointMake(100, 100);
            [bgView addSubview:bgImg];
        }

How to create UITextField programmatically: cocos2d/Xcode

In .h file:

        @interface SceneName : CCLayer <UITextFieldDelegate>
       
            UITextField *nameField;

In .m file:

   // To create UITextField and assigning properties//

        -(void)createTextField{
           // create a UIView here(say profileView). Then do the following code //

            nameField = [[UITextField alloc] initWithFrame:CGRectMake(5, 20, 150, 30)];
            nameField.center = CGPointMake(285, 120);
            nameField.backgroundColor = [UIColor whiteColor];
            nameField.textAlignment = UITextAlignmentCenter;
            nameField.delegate = self;
            [nameField.layer setBorderColor:[[UIColor redColor]CGColor]];
            [nameField.layer setBorderWidth:1];
            nameField.layer.cornerRadius = 8;
            nameField.contentVerticalAlignment = UIControlContentVerticalAlignmentCenter;
            [nameField addTarget:self action:@selector(valueChanged)
                                   forControlEvents:UIControlEventEditingChanged];
            [profileView addSubview:nameField];
        }

  
   // To resign first responder/keyboard //
   
        -(BOOL)textFieldShouldReturn:(UITextField *)textField
            {
                [textField resignFirstResponder];
                NSLog(@"%@ ",textField.text);                       // To get/print the data from the TextField
                return YES;
            }

        -(void)valueChanged{
            // To Limit text field text length //
            if ([nameField.text length] > 12) {
                nameField.text = [nameField.text substringToIndex:12];
            }
        }

    /*---------Some other important UITextField delegates---------*/
    -(BOOL) textField:(UITextField *)textField shouldChangeCharactersInRange:(NSRange)range replacementString:(NSString *)string{
        return YES;
    }

    - (BOOL) textFieldShouldBeginEditing:(UITextField *)textField{
        return YES;
    }

    - (void) textFieldDidBeginEditing:(UITextField *)textField
    {
   
    }
  

Saturday, 1 June 2013

How to detect shake using accelerometer: cocos2d/Xcode


    // in init //
        bool shake_once = false;
        self.isAccelerometerEnabled = YES;

    // accelerometer method //

    -(void) accelerometer:(UIAccelerometer *)accelerometer didAccelerate:(UIAcceleration *)acceleration
        {
            float threshold = 2;
   
            if(acceleration.x > threshold || acceleration.x < -threshold ||
               acceleration.y > threshold || acceleration.y < -threshold ||
               acceleration.z > threshold || acceleration.z < -threshold){
       
                if(!shake_once){
                    shake_once =true;
                    NSLog(@"shaked shaked...");
           
                }
            }
            else{
                shake_once = false;
            }
   
   
        }